機械学習に精通し適切にデータを分類できるだけではなく、膨大なデータから課題を発見しソリューションを提示してリードできる
データドリブン・コンサルタント
が、市場に求められています。
アクセンチュア株式会社
データドリブン・コンサルタント/データからコンサルティングを主導するポジション
年収 800万~2000万円【必須(MUST)】
・コミュニケーション力(経験に囚われず)企画や新しいことをやりたい意欲
・統計解析やアナリティクスツールを使ってデータ分析からビジネスプランニングをした経験
・R/Python/SAS/SPSSなどのアナリティクスツール使用経験【歓迎(WANT)】
・クライアントフェイシングで業務にあたった経験
・プロジェクトマネジメント経験
データ分析に強くて課題解決能力も高い人材を目指したいです。
- 【4回目】Kaggle の Titanic Prediction Competition で機械学習を習得(scikit-learn編)
- 【3回目】Kaggle の Titanic Prediction Competition で機械学習を習得(Keras Functional API編)
- 【2回目】Kaggle の Titanic Prediction Competition で機械学習を習得(Jupyter Notebook編)
- 【1回目】Kaggle の Titanic Prediction Competition で機械学習を習得(Keras導入編)
「勾配ブースティング決定木」がKaggleコンペで勝利に貢献し続けているそうです。
調べて試してみました。
勾配ブースティング決定木(Gradient Boosting Decision Tree)
勾配ブースティングは注目度の高い機械学習手法であり、今日のデータ分析競技には必須とも言える存在です。
[引用] 決定木の2つの種類とランダムフォレストによる機械学習アルゴリズム入門
「勾配ブースティング」って何?
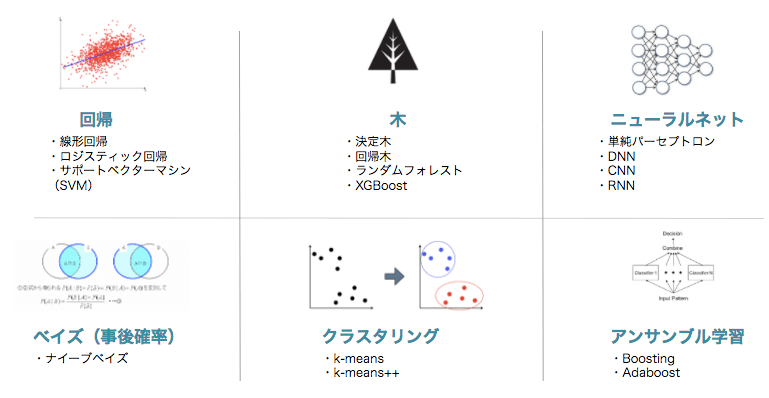
アンサンブル学習の一つ。
ブースティングの一つ。
クラス分類手法・回帰分析手法は何でもよいが、基本的に決定木を用いる。
「アンサンブル学習」って何?
多数決をとる方法。
個々に別々の学習器として学習させたものを融合させる事によって、未学習のデータに対しての予測能力を向上させるための学習
「ブースティング」って何?
学習データの情報を全て使うのでなく、その一部を使用して学習し、最後に結合させる方法。
ただし、以前に使用したデータを再利用してブーストするため、バギングのように並列処理は不可能。
「決定木」って何?
条件分岐によってグループを分割して分類する手法。
その際にグループがなるべく同じような属性で構成されるように分割する。
「バギング」って何?
アンサンブル学習の主流な方法の1つ。
学習データの情報を全て使うのでなく、その一部を使用して学習し、最後に結合させる方法。
「勾配ブースティング決定木」のフレームワーク
「XGBoost(2014年)」や「LightGBM(2017年)」「CatBoost(2017年)」が有名。
機械学習のコミュニティで世界的に有名なKDnuggetsによると、Kaggleで上位ランキングを取った半数以上もの勝者が「勾配ブースティング」を使った実績があると報じている。
[引用] LightGBMの解説
「XGBoost」を試してみる
XGBoostとは,先程のGradient BoostingとRandom Forestsを組み合わせたアンサンブル学習です。
インストール
Python3.6だとpip installできませんでしたが、Python3.8をインストールしたらXGBoostをインストールすることができました。
|
1 2 3 4 5 6 7 |
# /c/Python38/Scripts/pip install xgboost Collecting xgboost Downloading https://files.pythonhosted.org/packages/5e/49/b95c037b717b4ceadc76b6e164603471225c27052d1611d5a2e832757945/xgboost-0.90-py2.py3-none-win_amd64.whl (18.3MB) Requirement already satisfied: numpy in c:\python38\lib\site-packages (from xgboost) (1.17.4) Requirement already satisfied: scipy in c:\python38\lib\site-packages (from xgboost) (1.4.1) Installing collected packages: xgboost Successfully installed xgboost-0.90 |
利用方法
使い方は簡単です。
|
1 2 3 4 |
from xgboost import XGBClassifier model = XGBClassifier() model.fit(x_train, y_train) |
「LightGBM」を試してみる
LightGBMとは決定木アルゴリズムに基づいた勾配ブースティング(Gradient Boosting)の機械学習フレームワークです。
LightGBMは米マイクロソフト社がスポンサーをしています。
インストール
pip でインストール可能です。
|
1 2 3 4 5 6 7 8 9 |
# # /c/Python38/Scripts/pip install lightgbm Collecting lightgbm Downloading https://files.pythonhosted.org/packages/1f/cb/a8ec24334c35a7d0c87b4e4e056bd2137573c7c1bd81c760b79a2f370254/lightgbm-2.3.1-py2.py3-none-win_amd64.whl (544kB) Requirement already satisfied: scikit-learn in c:\python38\lib\site-packages (from lightgbm) (0.22) Requirement already satisfied: scipy in c:\python38\lib\site-packages (from lightgbm) (1.4.1) Requirement already satisfied: numpy in c:\python38\lib\site-packages (from lightgbm) (1.17.4) Requirement already satisfied: joblib>=0.11 in c:\python38\lib\site-packages (from scikit-learn->lightgbm) (0.14.1) Installing collected packages: lightgbm Successfully installed lightgbm-2.3.1 |
利用方法
使い方は簡単です。
学習用パラメータを記載するとすると次のようになります。
|
1 2 3 4 |
from lightgbm import LGBMClassifier model = LGBMClassifier() model.fit(x_train, y_train) |
「Catboost」を試してみる
CatBoost は学習にかかる時間が LightGBM や XGBoost に劣るものの、特にカテゴリカル変数を含むデータセットの扱いに定評があるアルゴリズムです。
2017年7月に、ロシアのGoogleと言われているYandex社から公開されました。
インストール
pip でインストール可能です。
|
1 2 3 4 5 6 7 8 9 |
# # /c/Python38/Scripts/pip install catboost Collecting catboost Downloading https://files.pythonhosted.org/packages/cd/ae/23649c32ab7076a4fb93261582c5ee7e33a4909a7caa5d4f57310f333aaf/catboost-0.20.1-cp38-none-win_amd64.whl (63.2MB) Collecting plotly ... Installing collected packages: retrying, plotly, cycler, kiwisolver, pyparsing, matplotlib, graphviz, catboost Running setup.py install for retrying: started Running setup.py install for retrying: finished with status 'done' Successfully installed catboost-0.20.1 cycler-0.10.0 graphviz-0.13.2 kiwisolver-1.1.0 matplotlib-3.1.2 plotly-4.4.1 pyparsing-2.4.5 retrying-1.3.3 |
利用方法
使い方は簡単です。
学習用パラメータを記載するとすると次のようになります。
|
1 2 3 4 |
from catboost import CatBoostClassifier model = CatBoostClassifier() model.fit(x_train, y_train) |
Kaggle の Titanic Prediction Competitionで試した結果
|
1 2 3 4 5 6 7 8 9 10 11 12 13 14 |
LGBMClassifier Accuracy: 0.9325842696629213 [[49 7] [ 7 27]] Model[0] Testing Accuracy = "0.8444444444444444 !" CatBoostClassifier Accuracy: 0.9339887640449438 [[51 5] [ 7 27]] Model[1] Testing Accuracy = "0.8666666666666667 !" XGBClassifier Accuracy: 0.8721910112359551 [[52 4] [ 9 25]] Model[2] Testing Accuracy = "0.8555555555555555 !" |
精度・正解率ともに「CatBoost」「LightGBM」「XGBoost」の順に高いです。
特徴量の重要度をプロット
ランダムフォレストに代表される決定木ベースのアンサンブル分析器では、特徴量の重要度を算出することができます。
「LightGBM」の例です。
|
1 2 3 4 5 6 7 |
import lightgbm as lgb from matplotlib import pyplot as plt model = lgb.LGBMClassifier() model.fit(x_train, y_train) lgb.plot_importance(model) plt.show() |
次のように出力されます。
「Fare(運賃)」「Age(年齢)」を重要視して分類していることが可視化されました。
「Sex(性別)」「Age(年齢)」が重要だと思っていたので意外です。
ソースコード
「前回」のコードを借用し、importとclf_names 部分を修正しています。
こちらも簡単です。
|
1 2 3 4 5 6 7 8 9 10 11 12 13 14 15 16 17 18 19 20 21 22 23 24 25 26 27 28 29 30 31 32 33 34 35 36 37 38 39 40 41 42 43 44 45 46 47 48 49 50 51 52 53 54 55 56 57 58 59 60 61 62 63 64 65 66 67 68 69 70 71 72 73 74 75 76 77 78 79 80 81 82 83 84 85 86 87 88 89 90 91 92 93 94 95 96 97 98 99 100 101 102 103 104 105 106 107 108 109 110 |
import time import numpy as np import pandas as pd from sklearn.metrics import confusion_matrix from sklearn.preprocessing import StandardScaler from xgboost import XGBClassifier from lightgbm import LGBMClassifier from catboost import CatBoostClassifier import lightgbm as lgb from matplotlib import pyplot as plt # Data Cleansing def normalize_data(data): data = data.drop(["PassengerId", "Name", "Ticket", "Cabin"], axis=1) # Changing the name of Column (PClass) to (TicketClass) for easy understanding data = data.rename(columns = {"Pclass":"TicketClass"}) # Complement the missing values of "Age" column with average of "Age" data["Age"] = data["Age"].fillna(data["Age"].mean()) # 全てのAgeを平均 0 標準偏差 1になるように標準化 scaler = StandardScaler() data["Age"] = scaler.fit_transform(data["Age"].values.reshape(-1, 1)) # Complement the missing values of "Fare" column with average of "Fare" data["Fare"] = data["Fare"].fillna(data["Fare"].mean()) # Convert "Sex" to be a dummy variable (female = 0, Male = 1) data["Sex"] = data["Sex"].replace(["male", "female"], [0, 1]) # Convert "Embarked" to be a dummy variable (S = 0,C = 1, Q = 2) data["Embarked"] = data["Embarked"].fillna("S") data["Embarked"] = data["Embarked"].replace(["C", "S", "Q"], [0, 1, 2]) return data # 学習用データ x_data、検証用結果 y_data の割り当て def build_train_test_data(data, rate=0.8): # 答えの削除 y_data = data["Survived"] x_data = data.drop(["Survived"], axis=1) # 全データのうち、80% を学習用データ、20% を検証用データに割り当て train_size = int(len(x_data) * 0.8) # 80% を学習用データ x_train = x_data[:train_size] # Inputs y_train = y_data[:train_size] # Output (Survived) # 20% // 2 小数点以下は切り捨て valid_test_size = (len(x_data) - train_size) // 2 # 10% を検証用テストデータ x_test = x_data[valid_test_size + train_size:] y_test = y_data[valid_test_size + train_size:] # 作成した行列出力 print("x_train:{}".format(x_train.shape)) print("y_train:{}".format(y_train.shape)) print("x_test:{}".format(x_test.shape)) print("y_test:{}".format(y_test.shape)) return x_train, y_train, x_test, y_test clf_names = ["LGBMClassifier", "CatBoostClassifier", "XGBClassifier", ] def sklearn_model(x_train, y_train): start = time.time() models = list() model = None # もっと精度が高いモデル total = 0.0 name = "" for i in range(len(clf_names)): clf = eval("%s()" % clf_names[i]) clf.fit(x_train, y_train) score = clf.score(x_train, y_train) print('%s Accuracy:' % clf_names[i], score) if (clf_names[i] == "LGBMClassifier"): lgb.plot_importance(clf) plt.show() if (clf_names[i] == "XGBClassifier"): xgb.plot_importance(clf) plt.show() models.append(clf) if total <= score: total = score model = clf name = clf_names[i] print(str(time.time() - start)) print('%s was selected' % name) return models, model def output(model, x_test, y_test): for i in range(len(model)): cm = confusion_matrix(y_test.ravel(), model[i].predict(x_test)) #extracting TN, FP, FN, TP TN, FP, FN, TP = confusion_matrix(y_test, model[i].predict(x_test)).ravel() print(cm) print('Model[{}] Testing Accuracy = "{} !"'.format(i, (TP + TN) / (TP + TN + FN + FP))) print()# Print a new line def main(): # CSVを読み込む df_train = pd.read_csv("train.csv") normalized_data = normalize_data(df_train) x_train, y_train, x_test, y_test = build_train_test_data(normalized_data, 0.8) models, model = sklearn_model(x_train, y_train) output(models, x_test, y_test) # テスト値を読み込み df_out = pd.read_csv("test.csv") predictions = model.predict(normalize_data(df_out)) df_out["Survived"] = np.round(predictions).astype(np.int) # CSVに出力する df_out[["PassengerId","Survived"]].to_csv("submission.csv",index = False) main() |
まとめ
完全にブラックボックスで利用していますが、学習モデルのトレンド含めて一通りは紹介しました。
今後は、パラメータ調整や理論を少しずつ理解しつつKaggleの他のサンプルを例にしながら勉強を進めていきます。


