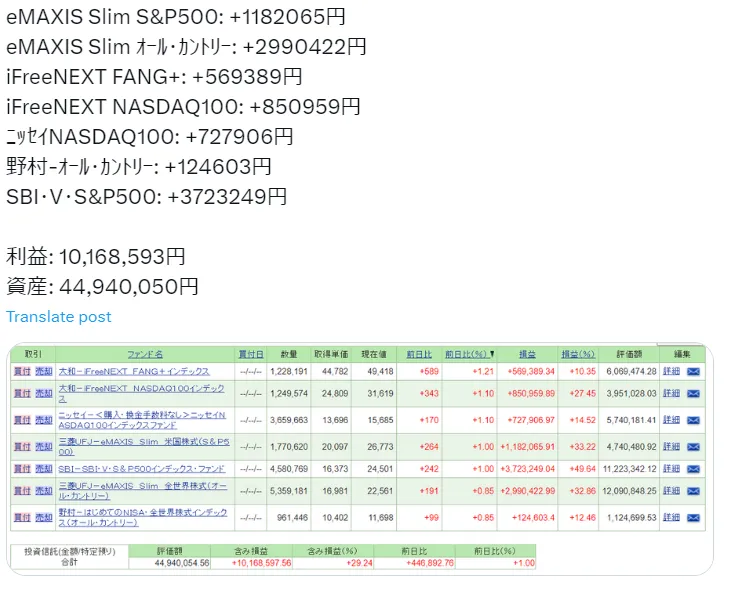
あまりに投資信託(特別口座)の利益が良いので調子に載って画像もtwitter(X)にアップロードしてみる。
昨年7月末に約2400万円の投資額で430万円程度の利益だった(1年3ヶ月の保有)。
今年の2月には約3500万円の投資額で1000万程度の利益が出てる(約2年保有)。
Twitterでのつぶやきは実装済み。

そして今回も作成にあたり
ChatGPT様より御神託を賜わった
© 泡沫に神は微睡む/安田 のら/KADOKAWA
ほんとに ありがてぇ……ありがたいこった!
StackOverflowサイト見て解決せず何日もかかる調査時間が不要となり、数時間で完成するようになった。
画像付きツイートの実現方法
v2 APIでは画像付きツイートを投稿することができない……とか書いてあるけど、ググったら色々とサンプルが見つかる。
API v1 を使ってるかもしれないが、何がv1でv2なのか全く分かってない。
|
1 2 3 4 5 6 7 8 9 10 11 12 13 14 15 16 17 18 19 20 21 22 23 24 25 26 27 28 29 30 |
import tweepy t_delta = datetime.timedelta(hours=9) # 9時間 JST = datetime.timezone(t_delta, 'JST') # UTCから9時間差の「JST」タイムゾーン now = datetime.datetime.now(JST) # タイムゾーン付きでローカルな日付と時刻を取得 #Twitter Developer Portalから取得したキーを設定 consumer_key = 'xxxxxxxx' consumer_secret = 'xxxxxxxxx' access_token = 'xxxxxxxxx' access_token_secret = 'xxxxxxxx' # Authenticate Twitter API auth = tweepy.OAuthHandler(consumer_key, consumer_secret) auth.set_access_token(access_token, access_token_secret) # Create API object api = tweepy.API(auth) client = tweepy.Client( consumer_key=consumer_key, consumer_secret=consumer_secret, access_token=access_token, access_token_secret=access_token_secret) # Attach image and message to tweet image_path = './sample.jpg' # Specify image file path message = '投資信託(金額/特定預り)' # Specify message media = api.media_upload(filename=image_path) client.create_tweet(text=message, media_ids=[media.media_id]) |
とりあえずネットで見つけたサンプルを叩いたら即座にアップロードできた。
これでもう良い。
投資信託結果まで自動スクロール
ブラウザ画面のスクリーンショットを撮るために、投資信託の評価額の位置まで自動スクロールダウンさせる必要がある。
ただし株式投資をしていると銘柄に応じて座標軸が変わるので、取得開始位置は「投資信託(金額/特定預り)」の文字列がある場所まで。にした。
|
1 2 3 |
# スクロールダウンして特定の要素が表示されるまでループする target_element = WebDriverWait(driver, 10).until(EC.visibility_of_element_located((By.XPATH, "//b[text()='投資信託(金額/特定預り)']"))) driver.execute_script("arguments[0].scrollIntoView();", target_element) |
scrollIntoView() メソッドを使用して特定の要素が表示されるまでスクロールする。
要素が表示されるまで待機するために、WebDriverWait を使用し、visibility_of_element_located の条件を指定。
投資信託結果だけトリミング
スクリーンショットからPythonライブラリ(Pillow)を使って必要箇所だけにトリミングを行う。
|
1 2 3 4 5 6 7 8 9 10 11 |
# 画像を開く img = Image.open('cap_site.png') # headlessモードかどうかをチェックして取得位置を設定 if "--headless" in options.arguments: # headlessモードの場合 img_tri = img.crop((104, 15, 1103, 348)) else: # headlessモードでない場合 # (左上の x 座標, 左上の y 座標, 右下の x 座標, 右下の y 座標) img_tri = img.crop((29, 20, 1273, 430)) img_tri.save('re_cap_site.png') |
なお、headless モードだとスクリーン画面の大きさが異なったので、add_argument() メソッドで headless モードかどうかを判断して処理を変えている。
おわりに
ChatGPT様でのコーディング御神託はまさにチート。
やりたい処理を一瞬で教えてくれる。
それも自然言語で。
なろう風に言えば
AIチートが最強すぎて、僕のコーディングがまるで相手にならないんですがww
ソースコード
|
1 2 3 4 5 6 7 8 9 10 11 12 13 14 15 16 17 18 19 20 21 22 23 24 25 26 27 28 29 30 31 32 33 34 35 36 37 38 39 40 41 42 43 44 45 46 47 48 49 50 51 52 53 54 55 56 57 58 59 60 61 62 63 64 65 66 67 68 69 70 71 72 73 |
#coding: utf-8 from selenium import webdriver from selenium.webdriver.chrome.service import Service from selenium.webdriver.common.by import By from selenium.webdriver.common.keys import Keys from selenium.webdriver.chrome.options import Options from selenium.webdriver.support.ui import WebDriverWait from selenium.webdriver.support import expected_conditions as EC from PIL import Image import pandas as pd import json import time WAIT_TIME = 5 def login(driver, user_file): SETTINGS_DIR = "./settings/" with open(SETTINGS_DIR + user_file) as fs: info_mail = json.load(fs) account = info_mail['account'] pass_word = info_mail['pass_word'] driver.get('https://www.sbisec.co.jp/ETGate') WebDriverWait(driver, WAIT_TIME).until(EC.element_to_be_clickable((By.NAME, 'user_id'))).send_keys(account) driver.find_element(By.NAME, 'user_password').send_keys(pass_word) driver.find_element(By.NAME, 'ACT_login').click() def get_screenshot(driver, options): WebDriverWait(driver, WAIT_TIME).until(EC.element_to_be_clickable((By.CSS_SELECTOR, 'img[alt="ポートフォリオ"]'))).click() # スクロールダウンして特定の要素が表示されるまでループする target_element = WebDriverWait(driver, 10).until(EC.visibility_of_element_located((By.XPATH, "//b[text()='投資信託(金額/特定預り)']"))) driver.execute_script("arguments[0].scrollIntoView();", target_element) driver.save_screenshot("./cap_site.png") time.sleep(1) # 画像を開く img = Image.open('cap_site.png') # headlessモードかどうかをチェックして取得位置を設定 if "--headless" in options.arguments: # headlessモードの場合 img_tri = img.crop((104, 15, 1103, 348)) else: # headlessモードでない場合 # (左上の x 座標, 左上の y 座標, 右下の x 座標, 右下の y 座標) img_tri = img.crop((29, 20, 1273, 430)) img_tri.save('re_cap_site.png') def main(): # ブラウザを起動 options = webdriver.ChromeOptions() # headlessの有効化 options.add_argument('--headless') # バック側で開いてるウィンドウのサイズ options.add_argument("--window-size=1200x1000") # GPUの処理を停止させることによって処理向上につなげる options.add_argument("--disable-gpu") # スクリーンショット撮影でスクロールバーが邪魔になることをなくす options.add_argument("--hide-scrollbars") # Chromeドライバーを初期化 driver = webdriver.Chrome(options=options) try: fn = ['settings_sbi.json'] for fname in fn: login(driver, fname) get_screenshot(driver, options) time.sleep(1) finally: time.sleep(3) driver.quit() if __name__ == '__main__': main() |


